Showing posts with label how to. Show all posts

Thursday, September 12, 2013

Fall 2013 bead shows!

Are you heading to the fall bead shows this weekend?  First off, take an umbrella, obviously.  Second, read our blog about "How To Survive Your First Bead Show."  We wrote this last year at the request of some of our customers.  The bead shows this weekend are some of my favorite shows that come to the Denver area.  

At the Merchandise Mart:
Bead Renaissance Show
InterGem Show (wholesale, bring your sales tax ID)

At the Coliseum:
Mineral Fossil and Gem Show

Have fun!  Make good purchases! 


Saturday, May 4, 2013

Making paper lanterns...

I found this really great How To (on Pinterest) for these really CUTE paper lanterns.  I'm always looking for ways to decorate the store and thought these might be fun.  We're not just about making your own jewelry or being a super awesome Denver bead store, we're full on craft masters!  Craft.  Masters. 

We changed up the directions a little.  First, this project called for 8x8 paper, cut in half, so the lanterns would have been 4" high.  We wanted ours a little bigger, so we started with 12x12 paper, and didn't cut it in half.  


We did cut the "contrasting" strips from the original papers though.  So our final size ended up being 10x12.  We don't have a lot of scrapbook paper laying around, we should though, it's fun... and handy.

We drew a box an inch in from all sides.  Can I mention that we don't apparently have ANY rulers here.  HOW IS THAT POSSIBLE!

"I'm having so much fun right now!  This is the best ever," a direct quote from Aimee.

We drew lines an inch apart and cut them into strips (don't cut all the way down, or else it doesn't work) We used baby razor knives.  Aimee did.  I'm not allowed to have sharp things...  :)
 

Glue the ends together and voila! 

Add the contrasting paper to each end and there you have it!  We did hole punch the ends to add ribbons so we could hang them.

I don't think they're as cute as they are in the tutorial.  Why does that always happen!  Maybe it's because they're bigger.  Or not attached to that really cute purse.  It could be that we changed the dimensions too.  So instead of being 10x12, they should have been 6x12?  Who knows.

Thursday, March 28, 2013

Guest blog - Amy teaches us how to make little duck earrings

For my birthday last year, my friend Amy, with Old West Leather and Beads in Greeley, made me the cutest chicken earrings.  I get so many fun compliments on them.  I asked her to create a How To for us!  

The originals!
 "Spring calls for a new project …. and this one is simple and oh so fun!  I love these little duck beads, but couldn't decide what to do with them.  Then I thought, what do ducks need?  Water, of course!  And we have this cool blue SoftFlex craft wire …. since I like working with wire in my projects, this was a perfect fit.  Here's the step by step to make these little duckie earrings. Happy Spring!" - Amy

Supplies:
  •  2 glass duck beads
  • 36 inches of 22ga SoftFlex craft wire in Pacific Blue
  • 2 gold ear wires
  • round nose pliers
  • flush cutters
  • chain nose pliers


Step by step:
  1. Cut 36 inches of your 22ga wire with your flush cutters.
  2. Smooth the wire as much you can, then fold in half.
  3. In the center of your bent wire, take your chain nose pliers and squeeze gently to get the fold as tight as possible. *Remember that colored wire can scratch and the color come off, so be gentle with your pliers!
  4. Take the ends of your wire, bend at 90ยบ about 1/2” or just a bit more from the end, and make your loop for the earwires, using your round nose pliers.
  5. Take the folded end of your wire and run it through one of your duck beads from top to bottom.  Your earwire loop will be sitting on the top of your bead.
  6. From the bottom side of your bead, bend your wire again so it lays flat against your bead. From here you want to start forming a spiral.  You are not forming a tight spiral, this just helps give you a base for your duck to sit on. I don't recommend using pliers for this, just use your fingers and thumb to hold the wire in place.
  7. You want to spiral the wire out around the duck, I prefer to keep the wire fairly close to the bead, but not tight.  After about 2 times around the bead, take a loose wrap on one of the wires and continue wrapping in the same fashion until you get to the end of your wire.  
  8. At the very end of your wire, wrap tightly around one of your wires 2 wraps.  I recommend using your flat nose pliers to wrap the end.This will secure your end so it won't come undone.  Now you can “make waves” in your wire.  Bend gently with your fingers to form as you wish.
  9. Add your earwire.  Done!


Here's a collage of some of the beautiful things that Amy has made!  
I also included a link to her Etsy page, find a bit of inspiration.
http://www.etsy.com/shop/CowGirlGemz

Do you want to learn more about wire wrapping?  Take a wire wrapping class!  They're really neat and the skills are great to add into your jewelry making or to have a new fun hobby.  To take classes in Northern Colorado visit Amy at Old West Leather and Beads.  To take wire wrapping classes in our Denver location, visit us at The Colorado Bead Co

Saturday, March 2, 2013

DIY wrapped bracelet with ball chain - hmmm...

In the last few weeks we've had almost a dozen people come in to get supplies for these leather wrapped bracelets with ball chain and hemp from Honestly WTF.   And we've been all "honestly?  WTF are these people up to!"  So we decided to give this little tutorial a try.  Well, Sarah did...


I used hemp instead of wax linen and it worked great! I also used a bead instead of a hex nut for the clasp.  Make sure the hole of the bead is large enough so the leather cord when it's doubled will fit through it. I used a silver ball chain but we have over 20 different colors!


The tricky part is making sure both leather cords and the ball chain stay straight when you are wrapping them with the hemp so it doesn't end up twisted.  Make sure you pay attention to whether your cords are beginning to twist.  Also the tutorial didn't say whether the ball chain should go on top of the leather cords together or whether the ball chain needed to go in between the cords.  When I did it, I put the ball chain on top of both cords, so it was like a three high stack.  Looking back, I think it maybe should have gone between them, like a triangle with the leather at the bottom and the ball chain as the top part.


My first try wasn't the most successful, but I would definitely give it another try.  I hope these tips were helpful!

Happy beading!

~Sarah~


Thursday, February 21, 2013

how to make a single strand leather bracelet

Supplies:
  • 2 - fold over crimps
  • leather (we're using lead free leather in a 1.5mm)
  • 2 - 6mm jump rings
  • 1 - clasp
  • charms or beads that slide on the leather 
  How to:
  1.  Cut your leather to the correct length (remember that your clasp will take up 1/2" or more). For women's bracelets, the standard length is 6.5 to 7.5 inches. A bracelet of 7 inches is the most common in women's jewelry. (source: Overstock.)
  2.  Put a fold over crimp on one end of the leather.  To use a fold over crimp, you'll use your chain nose pliers and fold one side of the crimp over and into the leather. 
  3. Then fold the other side over.  This creates a secure 'tube' that your leather is in. 
  4. Open one of your jump rings (remember to twist your jump rings in opposite directions to open them; don't pull them apart - pulling them ruins the shape) and use it to attach your clasp to the loop on the fold over crimp.
  5. Slide on your charms, or in our case, a pretty little glass heart.
  6. Repeat steps 2 - 4.
Other ideas:

The bracelet below has two strands with the leather knotted between the beads, as well as a length of chain to make it adjustable.  To do this, instead of adding the jump ring to the non-clasp side, you just attach a few inches of chain.  I recommend making the actual bracelet part (the leather) shorter, so that you don't make your bracelet too long.


 - Anne.

P.S. - if you're confused or unsure about this project, we're always here to help!  We also offer a lot of jewelry making classes in our Denver bead store - The Colorado Bead Company

Friday, February 1, 2013

A weekend project - cluster earrings (how to)

What a fun late night project! Having 4 children, I love projects that I can finish in one sitting since I never know the next time that I will be able to sit and create in peace :) These little clusters can make big a statement in just a little package.

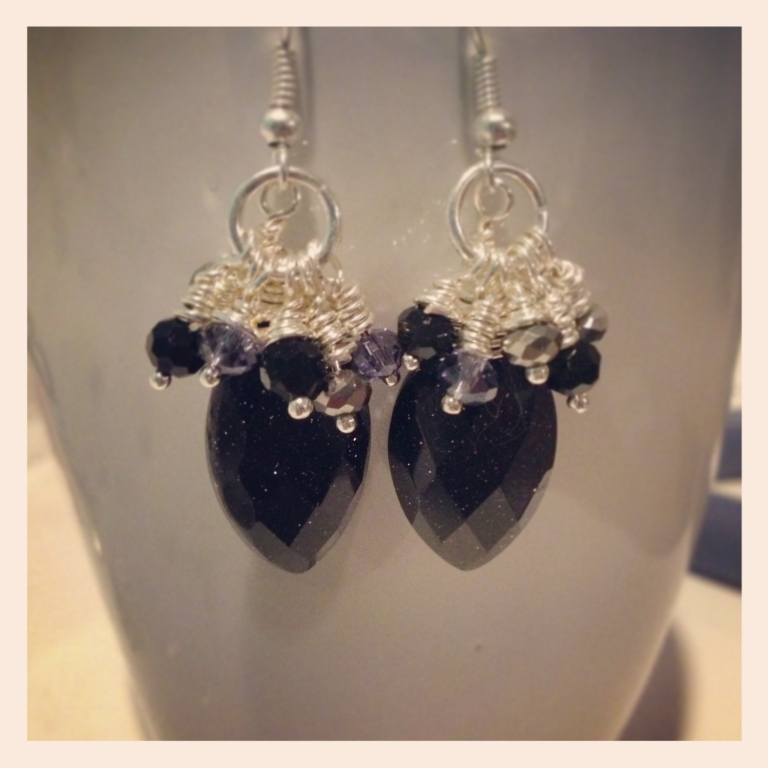
Red donuts with crystal and leaf clusters
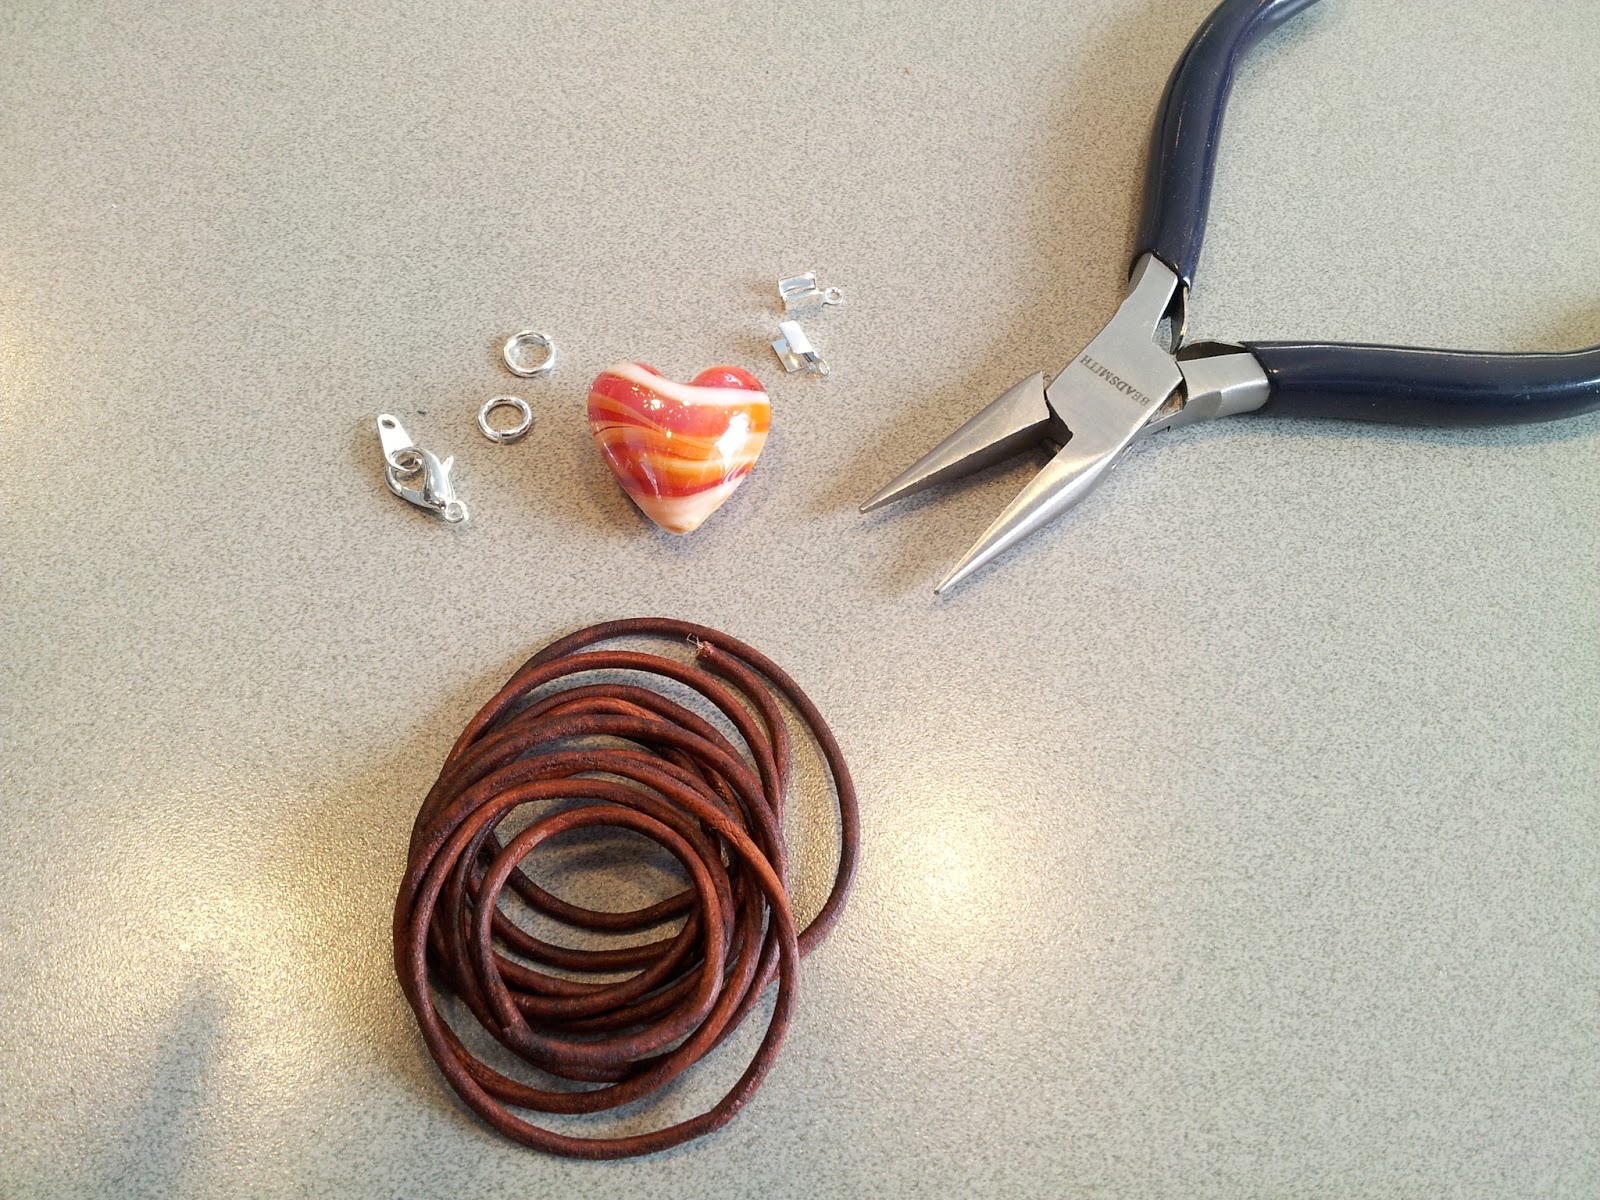
Supply list:
  • 2 - 1" donuts (you don't want these to be too heavy or else your ears will fall off)
  • 4 - glass leaf beads (the ones I used are drilled top to bottom and I liked them a lot, but briolette leaves would work too)
  • 8" - 22ga wire
  • 8 - glass crystals
  • 1 jump ring (6 or 8mm)
  • 2 - ear wires (if you're planning on giving these as a gift, don't forget to use nickel free ear wires, just in case the person you're giving them to has a nickel allergy)
  • headpins (I used the ball head pins we carry because they're a softer temper than most head pins and I wanted to wrap the ends)
How to wrap the doughnut bead:
  1. Cut four inches of 22ga wire.
  2. Put one inch of the 4” wire in the center hole. Fold both ends up towards the top. With the 3” section, wrap the doughnut 3 times.
  3. Make your loop with what you have left over of the long wire
    1. Not sure about loops?  Check out our wire loop making how to
  4. What is left of the shortened wire wrap the base of the longer wire to make it secure.
  5.  Repeat on the second doughnut.
For the smaller beads:
  1. Put each smaller bead on a ball head pin - do not trim the pin yet!
  2. Make your head pin loops and wrap the extra wire from the head pin around itself and toward the bead.
  3. Trim the excess wire.
Connecting everything:
  1. Open your jump ring, (tip: always twist a jump ring clockwise/counterclockwise to open, don't pull them straight out).
  2. Decide which beads you want on each earring.
  3. Put half of your beaded headpins onto a jump ring (1/4 of the total headpins).
  4. Put on your wrapped doughnut.
  5. Put the other half of your beaded headpins on.
  6. Slide on your ear wire.
  7. Close your jump ring.
  8. Repeat.
Another example!  This one is done with large briolettes in place of the donuts.

Blue goldstone briolettes with crystal clusters
 The ideas and color schemes are endless! The bead layout I have together for the next late night project is: Gold metal, light Blue, burnt orange, & dusty brown (but who knows when that is going to be!) I look forward to seeing what you all come up with!

 - Aimee

P.S. - if you're confused or unsure about this project, we're always here to help!  We also offer a lot of jewelry making classes in our Denver bead store - The Colorado Bead Company.  

Sunday, January 27, 2013

A wire gift - it's a tree...

Kody is going to be a new Aunt!  She got the news from her brother a few months ago and immediately started thinking about what she wanted to give her sister-in-law in celebration.  She decided to give her a wire wrapped tree, to symbolize life and growth.

She wanted to have everyone that was attending the shower pick out a bead that would be built into the tree.  Birthing beads on necklace and bracelets have been something that has been popular since before the store was opened... people pick a bead that is symbolic and something (necklace, bracelet, tree...) is created with those beads for the mother-to-be/bride-to-be to wear during pregnancy/on her wedding day, etc.  The beads can be anything really.  Beads have been chosen based on their metaphysical properties (rose quartz for love, citrine for confidence and courage, amazonite for relaxation during childbirth), they've been chosen because they remind people of experiences they've shared (blue for a trip to the ocean) or just because they've liked them. 

Wire Tree wall hanging

Supply list:

Wire:
80ft of 18ga soft temper round craft wire
90ft of 20ga soft temper round craft wire
135ft of 22ga soft temper round craft wire
* she used various colors - smokey quartz, vintage bronze, brown, some gold

Frame:
one 11x14" frame, should be very sturdy

Beads:
48" of gemstone chips for leaves
beads selected by family and friends

Hardware:
heavy duty staples

For removable pendants:
wire to wrap beads
chain
hooks from hook and eye clasps

Steps:

1 - hammer heavy duty staples around top and bottom of frame, these are your anchor points for your roots and branches
2 - cut all of your wire into 3 ft. sections; you'll need about 90 sections
At this point, you'll be following the steps/directions from the Branching Out Tree class or really any "Tree of Life" tutorials
3 - twist/braid sections of your wire together to create the trunk
4 - create and secure all of your roots to the staples at the bottom of the frame.
5 - create and secure all of your branches to the staples at the top of the frame (adding your beads, chain with hooks and leaves as you go)
6 - wire wrap beads for pendants and hang on hooks


After the roots had been secured, Kody started to layout where the beads would go.


The start of the branches


Leaves and flowers
From Kody:

It's finally complete!

The finished tree

This was a Baby Shower Gift for my Sister-in-law, Amanda. The Tree of Life symbolizes creation, and of course, my new baby nephew! 


Each member of the baby shower was invited to bring one bead to contribute to this Group Gift. Each bead you see here has been turned into a removable pendant. Each pendant has a unique meaning pertaining to Amanda and each member who participated in this Gift. This way, Amanda is able to wear a little piece of us during her last few weeks of pregnancy. This tree shall provide her with a peaceful transition into motherhood. ♥


Rose Quartz and Flourite adorn this tree, as well as a whole lot of ~Love~ from Amanda's circle of friends/family.


  * * * 

Thank you so much to Kody for letting us be involved in this project, it was a lot of fun and a great learning experience!  To see more of her pieces or to request something custom, you can contact her via her Facebook page.  Are you interested in making a wire wrapped tree (a wire tree of life) on your own?  We offer the Branching Out Wire Tree Pendant class about once a month in our Denver bead store - The Colorado Bead Company.