Showing posts with label bracelet. Show all posts

Sunday, June 2, 2013

Weekly wrap up - Sunday, June 2nd

I love reusing and repurposing stuff into new stuff.  Our Upcycled Flower Necklace class is a perfect solution for soda cans (or beer cans).  You can also make earrings with the same technique.  :)  Check out Chris' necklace from this weekend - you'll never look at cans the same again!  (Are you friends following us on Instagram?)  We teach this class frequently for Girl Scouts... it's a perfect way for them to get their jewelry badge. 

We also had our maiden voyage of the Minneapolis bracelet class.  I had no idea how much I would LOVE teaching this class and the pieces that come from it.  I started one in class and didn't finish it, so Sarah finished it for me yesterday.  She's awesome, and the bracelet looks good, but I don't think she got bit by the "seed bead" bug... 


On the bead store front, we're very sad to say that our friend Megan at the Peacock shop is in her last week with a brick and mortar store front.  Stop over and check out her goodies before she goes exclusively online, she's off of 8th and Santa Fe, across from Fabric Bliss.  Here's a link to her sassy Etsy page, if you're looking to shop online.  

We have some classes this week with space:

Macramazing!


We have an amazing update on a retro classic, creating crazy stylish bracelet, perfect for girls and guys. Learn how (or get a refresher) to work with satin cord to make these trendy bracelets that are great for layering and rich with texture. Experiment with different colors and findings to see what suits you best. Come macrame with us!  (We have some ABBA already loaded on the iPod!)  Level: Beginner. Mon, June 3rd at 6p

Foundations

Learn the essentials to get started making your own beautiful beaded creations. Our wonderful instructors will show you how to work with tools and use basic beading supplies. During class, you will finish a necklace and a pair of earrings, and you'll gain the confidence to become a jewelry artist! Not sure what kind of necklace you want?  Any of our team will be happy to help you pick something else out.  Level: Beginner.  Tuesday, June 4th at 6pm.

Earring Party

Join the party--whether you are a new beader or an experienced earring enthusiast, you will love the Earring Party for May and June. This party will make the three pairs of earrings pictured. Learn different techniques incorporating head pins, wire, briolettes, and more. With the new format of our earring class, every session will offer a fresh collection of earrings so you can stay in fashion as the seasons change. Don’t worry about shopping—we’ve already found all of the coolest parts for you!  Level: Beginner.  Thursday, June 6th at 6pm.

We've been hard at work on classes for July and August.  We have some great things to show for it too!  A lot of our classes are getting reboots, so they'll be similar... and yet different.  :)  Don't worry, they'll still be awesome.  We also have some new classes for you - Ice resin and a class on how to make your own findings?!  Sign us up!  

This little hot thing will be on the schedule too - Hey, hey Ombre!

 Have a great week this week friends, it's supposed to be gorgeous!
- anne.

Saturday, June 1, 2013

Take one! The Minneapolis bracelet!

When we decide to offer a new class, we typically do it in a couple of ways - 1. it's something that has been suggested, lots of times by lots of people; creating projects that teach new skills, don't take for-ever and don't cost a ton of money in supplies can be harder than you think.  2.  it's something that is really awesome and we want to share. 

The Minneapolis bracelet came from a similar class that our friends at The Bead Monkey in Minneapolis offer.  :)  See the name connection there?  The bracelets that come from that class are always so pretty and I really liked the idea of a 'simple' bead weaving project.  Bead weaving is something that most people either like or they don't, seed beads are awfully tiny.  


I'm always a little nervous for a new class.  I know that I know how to do it, and I've taught it to at least one of my co-workers, and usually my mom (she's typically a really good person to test classes on, because she doesn't hesitate to not pay attention to directions or to ask lots of questions).  I never really know though how a group of people is going take to directions or if maybe my math somewhere was off or what is going to happen.

GOOD NEWS THOUGH!  Usually our maiden voyages of a class goes fairly well.  The Minneapolis bracelet class was no exception.  I was very lucky to have a great crew in class as well, that's always a huge help.  Jacki, Alex, and Chris did wonderfully!  Their bracelets turned out beautifully. 


{ squeal } I am so in love with these!  And this class!

Sunday, May 19, 2013

Sending your husband to the bead store? Make a list! Weekly wrap up May 19th

Sending your husband to the bead store to get supplies? Make him a list! Chris just came in with this list that Sarah made. :)

Sarah has taken a few classes with us and makes the cutest jewelry for kids!  It's completely envious!  She's going to be at the Sweet William Market in Stapleton on Saturday, May 25th with a bunch of our other friends.  :)  Go say hey!  Check out their incredible goodies.  

We have a few classes this week that still have space!

Knotty Knots pearl knotting on Tuesday, May 21st
Pearl knotting is a great skill to have in your arsenal, and we'll will teach you everything you need to know to get started. Indulge in Swarovski pearls to make this modern update to a classic style. Learn the trick to knotting pearls using silk thread, creating a knot in between each bead. See how to finish your new bracelet using clamshells and a classy toggle clasp. Your bracelet will make the perfect addition to every outfit.  Register here.

Oh Deer! Bracelet on Thursday, May 23rd at 6pm (one space left)
Have you herd the news? People just FAWN all over this little bracelet!  It's so cute and so practical for practicing your jewelry making on!  This class is designed to cover so many different techniques for you. We'll cover beading wire, crimp beads and covers, attaching chain, connecting beads with eyepins, using headpins to make charms, and properly opening and closing jump-rings.  Register here.

There's also space in Saturday's Wire Wrapped Bracelet class and Tuesday, May 28th Caged Stone pendant class.

On Monday was the most amazing Macramazing class!  Have you seen the shamballa style bracelets pretty much everywhere the last few months?  Us too! 
You can see the full album from this class on our Facebook page.   

We've had a slew of the under 10 crowd this weekend.  I love these little necklaces that Scarlett and Stella made in the Foundations Intro to Beading class on Saturday. 
We had a few birthday parties this weekend too!  Birthdays and jewelry/beading party?  SO FUN!  Huge thanks to everyone who joined us this weekend!  

Have a great week friends... and remember... 

See you soon.  <3 anne.
 

Thursday, April 11, 2013

wire wrapped bracelets - February class pictures

The wire wrapped bracelet class is one of our most popular classes, and certainly our most popular wire wrapping class.  Typically everyone leaves with a wonderful piece of jewelry that they wear out and really awesome skills!

This project is so easy and fun to do. This festive bracelet is a great way to start and practice wire wrapping. Create beaded links with streamlined wire coils capping the top and swirling down to the other end. This is a great way to highlight individual beads with metallic detail, while getting a feel for working with wire. - see the dates for this class and register here http://bit.ly/12MZQQq


 to see more pictures from this class, click here

Sunday, April 7, 2013

Weekly wrap up - Sunday, April 7th

It has been a busy week here!  It's been a great week, but a bit busy!  I've been working on finalizing the May scheduling and getting a bit of the June schedule done too; it's so time consuming... and so much fun.

We have some classes next week that still have space, give us a call or register online:

Tuesday, April 9th at 6pm - Caged Stone Pendants (1 space left!)
Thursday, April 11th at 9am - Wire Wrapped Stone bracelet (m+m, 12+)
Saturday, April 13th at 1pm - Birds Nest Rings + Pendants (m+m, 8+)
Sunday, April 14th at 1pm - Craft It! Afternoon (m+m)

Here's a sneak peek at the new classes for May:

Earring Party for May and June


Join the party--whether you are a new beader or an experienced earring enthusiast, you will love the Earring Party! This party will make the three pairs of earrings pictured (Daydream Weaver earrings, mixed up clusters with feather charms, and the mobius chainmaille flowers). Learn different techniques incorporating head pins, wire, briolettes, and more.  Level: beginner.  Cost: $30 (all supplies included)
 

Saturday, May 11th at 1pm 
Thursday, June 6th at 6pm

Love Me Knots chainmaille bracelet


This is a wonderful chainmaille weave to fall in love with. We'll use colored jump rings to make our love knot clusters and create a beautiful bracelet with them. This is a great class to practice opening and closing jump rings, creating a sweet bracelet to wear. Level: Beginner. Cost: $35.  All supplies included.


Minneapolis bracelet

To know it is to love it!  Get to know bead weaving a little bit better by mixing sparkly crystals and classic pearls with seed beads. Practice weaving with two needles as you follow this crossweave pattern. You'll wear home your glamorous bracelet that will make you feel gorgeous each time you put it on.  This lovely little bracelet is a shout-out to our friends at The Bead Monkey in Minneapolis, if you're in the area, check them out!  Cost: $30.  All supplies included.


Hopefully I'll have the schedule finished on Monday and send it out to everyone. 

***

In other fun news, Sarah made this really cute necklace with the new bird connectors we got in. She used a thin chain, wire wrapped some tiny stones and connected the bird.  


Saturday, March 2, 2013

DIY wrapped bracelet with ball chain - hmmm...

In the last few weeks we've had almost a dozen people come in to get supplies for these leather wrapped bracelets with ball chain and hemp from Honestly WTF.   And we've been all "honestly?  WTF are these people up to!"  So we decided to give this little tutorial a try.  Well, Sarah did...


I used hemp instead of wax linen and it worked great! I also used a bead instead of a hex nut for the clasp.  Make sure the hole of the bead is large enough so the leather cord when it's doubled will fit through it. I used a silver ball chain but we have over 20 different colors!


The tricky part is making sure both leather cords and the ball chain stay straight when you are wrapping them with the hemp so it doesn't end up twisted.  Make sure you pay attention to whether your cords are beginning to twist.  Also the tutorial didn't say whether the ball chain should go on top of the leather cords together or whether the ball chain needed to go in between the cords.  When I did it, I put the ball chain on top of both cords, so it was like a three high stack.  Looking back, I think it maybe should have gone between them, like a triangle with the leather at the bottom and the ball chain as the top part.


My first try wasn't the most successful, but I would definitely give it another try.  I hope these tips were helpful!

Happy beading!

~Sarah~


Thursday, February 21, 2013

how to make a single strand leather bracelet

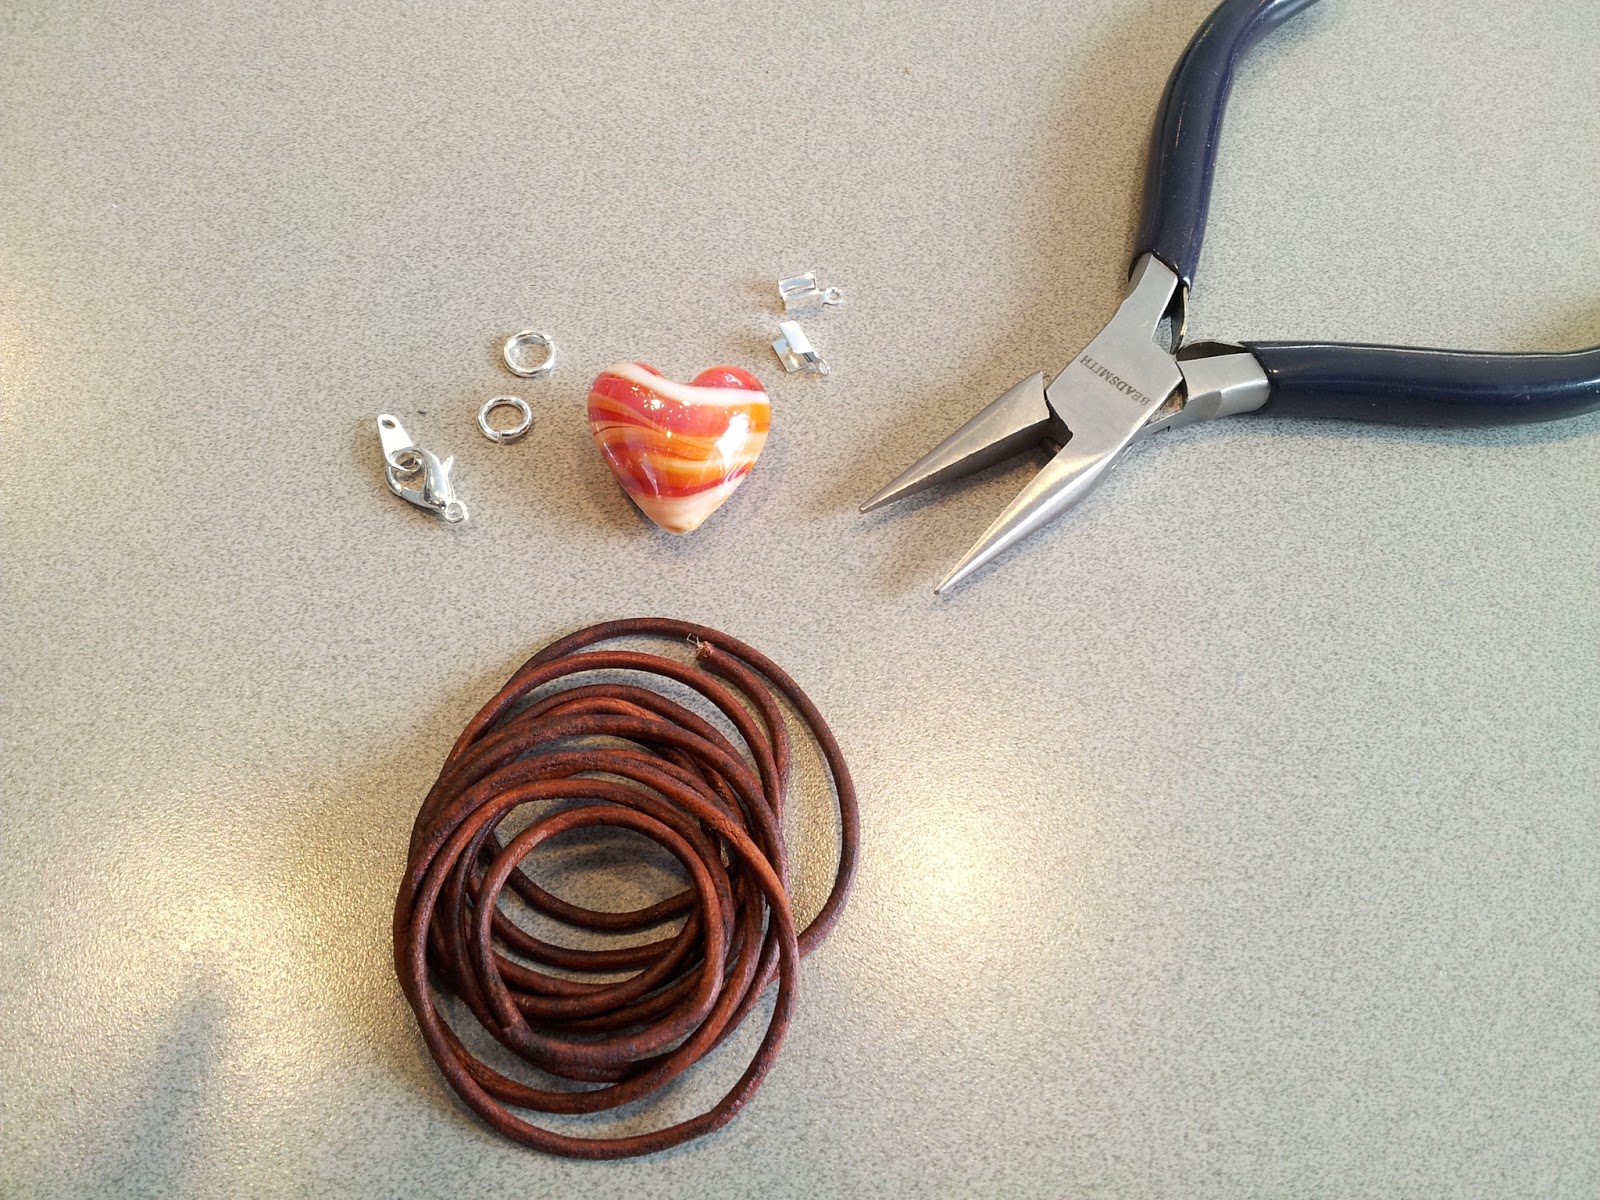
Supplies:
  • 2 - fold over crimps
  • leather (we're using lead free leather in a 1.5mm)
  • 2 - 6mm jump rings
  • 1 - clasp
  • charms or beads that slide on the leather 
  How to:
  1.  Cut your leather to the correct length (remember that your clasp will take up 1/2" or more). For women's bracelets, the standard length is 6.5 to 7.5 inches. A bracelet of 7 inches is the most common in women's jewelry. (source: Overstock.)
  2.  Put a fold over crimp on one end of the leather.  To use a fold over crimp, you'll use your chain nose pliers and fold one side of the crimp over and into the leather. 
  3. Then fold the other side over.  This creates a secure 'tube' that your leather is in. 
  4. Open one of your jump rings (remember to twist your jump rings in opposite directions to open them; don't pull them apart - pulling them ruins the shape) and use it to attach your clasp to the loop on the fold over crimp.
  5. Slide on your charms, or in our case, a pretty little glass heart.
  6. Repeat steps 2 - 4.
Other ideas:

The bracelet below has two strands with the leather knotted between the beads, as well as a length of chain to make it adjustable.  To do this, instead of adding the jump ring to the non-clasp side, you just attach a few inches of chain.  I recommend making the actual bracelet part (the leather) shorter, so that you don't make your bracelet too long.


 - Anne.

P.S. - if you're confused or unsure about this project, we're always here to help!  We also offer a lot of jewelry making classes in our Denver bead store - The Colorado Bead Company. 

Sunday, January 20, 2013

A dainty little bracelet

The prettiest, dainty little bracelet came in this morning for a bit of lengthening.  It was given as a gift for Christmas this year, from a daughter to her mother, and was just a smidge too short.  I found it to be just beautiful though and I fell in love.


What would I need to make something similar?  I wanted a necklace though, I NEED a new necklace.  :)  NEED.

Supplies:

Chain - you'll want fairly thin chain, if you're planning to stay with the delicate feel (1mm or so), I think the original was a 1.2mm, I used a 1mm on mine.
Jump rings - you'll need 5 jump rings, 4 4mm rings and an 8mm ring.  The original had a twisted jump ring, which I don't have, so I just went with a regular one.
Clasp - this bracelet uses a spring ring clasp; I put a lobster on my necklace, just because it was what I had laying around.
Briolettes - however many you'd like, this one uses two of different sizes (there is garnet and citrine in the bracelet; I used a chalcedony briolette that Sarah got me when she was in Austin for Christmas and an aquamarine briolette that we had here on the single bead table)
Charm - the charm on the bracelet is hand stamped and has the initial of the owner; I went with a little feather though.  I love feathers.
Wire - it should fit through your briolette holes, sometimes they can be very tiny, I'd guess you'll need a 24 or 26ga.  For my briolettes, I needed 26ga for the chalcedony and 24ga for the aquamarine.


Steps:

1 - wrap your briolettes
2 - attach your briolettes and charm to your 8mm jump ring
3 - cut your length of chain, you'll need two pieces of equal length; I wanted a fairly short necklace so I went with 8.5"
4 - attach 4mm jump rings to each end
5 - connect one jump ring to your clasp

and you have yourself a beautiful little piece of jewelry.

Here's mine.  I LOVE it.  I'm very happy with how it turned out!  In fact, I'm wearing it right now.


Anne.